privatestaticvoidprocessSelectedKey(SelectionKeyk,AbstractNioChannelch){finalNioUnsafeunsafe=ch.unsafe();if(!k.isValid()){// close the channel if the key is not valid anymoreunsafe.close(unsafe.voidPromise());return;}try{intreadyOps=k.readyOps();// Also check for readOps of 0 to workaround possible JDK bug which may otherwise lead// to a spin loopif((readyOps&(SelectionKey.OP_READ|SelectionKey.OP_ACCEPT))!=0||readyOps==0){unsafe.read();if(!ch.isOpen()){// Connection already closed - no need to handle write.return;}}if((readyOps&SelectionKey.OP_WRITE)!=0){// Call forceFlush which will also take care of clear the OP_WRITE once there is nothing left to writech.unsafe().forceFlush();}if((readyOps&SelectionKey.OP_CONNECT)!=0){// remove OP_CONNECT as otherwise Selector.select(..) will always return without blocking// See https://github.com/netty/netty/issues/924intops=k.interestOps();ops&=~SelectionKey.OP_CONNECT;k.interestOps(ops);unsafe.finishConnect();}}catch(CancelledKeyExceptionignored){unsafe.close(unsafe.voidPromise());}}
@Overridepublicvoidread(){asserteventLoop().inEventLoop();finalChannelConfigconfig=config();if(!config.isAutoRead()&&!isReadPending()){// ChannelConfig.setAutoRead(false) was called in the meantimeremoveReadOp();return;}finalintmaxMessagesPerRead=config.getMaxMessagesPerRead();finalChannelPipelinepipeline=pipeline();booleanclosed=false;Throwableexception=null;try{try{for(;;){intlocalRead=doReadMessages(readBuf);if(localRead==0){break;}if(localRead<0){closed=true;break;}// stop reading and remove opif(!config.isAutoRead()){break;}if(readBuf.size()>=maxMessagesPerRead){break;}}}catch(Throwablet){exception=t;}setReadPending(false);intsize=readBuf.size();for(inti=0;i<size;i++){pipeline.fireChannelRead(readBuf.get(i));}readBuf.clear();pipeline.fireChannelReadComplete();if(exception!=null){if(exceptioninstanceofIOException&&!(exceptioninstanceofPortUnreachableException)){// ServerChannel should not be closed even on IOException because it can often continue// accepting incoming connections. (e.g. too many open files)closed=!(AbstractNioMessageChannel.thisinstanceofServerChannel);}pipeline.fireExceptionCaught(exception);}if(closed){if(isOpen()){close(voidPromise());}}}finally{// Check if there is a readPending which was not processed yet.// This could be for two reasons:// * The user called Channel.read() or ChannelHandlerContext.read() in channelRead(...) method// * The user called Channel.read() or ChannelHandlerContext.read() in channelReadComplete(...) method//// See https://github.com/netty/netty/issues/2254if(!config.isAutoRead()&&!isReadPending()){removeReadOp();}}}
packagenetty;/** * Created by Administrator on 2016/7/13. */importio.netty.channel.ChannelHandlerContext;importio.netty.channel.ChannelInboundHandlerAdapter;publicclassClientHandlerextendsChannelInboundHandlerAdapter{@OverridepublicvoidchannelRead(ChannelHandlerContextctx,Objectmsg){System.out.println(msg);}@OverridepublicvoidexceptionCaught(ChannelHandlerContextctx,Throwablecause){cause.printStackTrace();ctx.close();}@OverridepublicvoidchannelActive(ChannelHandlerContextctx)throwsException{super.channelActive(ctx);}}
privatevoidset(ThreadLocalkey,Objectvalue){// We don't use a fast path as with get() because it is at// least as common to use set() to create new entries as// it is to replace existing ones, in which case, a fast// path would fail more often than not.Entry[]tab=table;intlen=tab.length;inti=key.threadLocalHashCode&(len-1);for(Entrye=tab[i];e!=null;e=tab[i=nextIndex(i,len)]){ThreadLocalk=e.get();if(k==key){e.value=value;return;}if(k==null){replaceStaleEntry(key,value,i);return;}}tab[i]=newEntry(key,value);intsz=++size;if(!cleanSomeSlots(i,sz)&&sz>=threshold)rehash();}
protectedfinalinttryAcquireShared(intunused){/* * Walkthrough: * 1. If write lock held by another thread, fail. * 2. Otherwise, this thread is eligible for * lock wrt state, so ask if it should block * because of queue policy. If not, try * to grant by CASing state and updating count. * Note that step does not check for reentrant * acquires, which is postponed to full version * to avoid having to check hold count in * the more typical non-reentrant case. * 3. If step 2 fails either because thread * apparently not eligible or CAS fails or count * saturated, chain to version with full retry loop. */Threadcurrent=Thread.currentThread();intc=getState();if(exclusiveCount(c)!=0&&getExclusiveOwnerThread()!=current)return-1;intr=sharedCount(c);if(!readerShouldBlock()&&r<MAX_COUNT&&compareAndSetState(c,c+SHARED_UNIT)){if(r==0){firstReader=current;firstReaderHoldCount=1;}elseif(firstReader==current){firstReaderHoldCount++;}else{HoldCounterrh=cachedHoldCounter;if(rh==null||rh.tid!=current.getId())cachedHoldCounter=rh=readHolds.get();elseif(rh.count==0)readHolds.set(rh);rh.count++;}return1;}returnfullTryAcquireShared(current);}
finalintfullTryAcquireShared(Threadcurrent){/* * This code is in part redundant with that in * tryAcquireShared but is simpler overall by not * complicating tryAcquireShared with interactions between * retries and lazily reading hold counts. */HoldCounterrh=null;for(;;){intc=getState();if(exclusiveCount(c)!=0){if(getExclusiveOwnerThread()!=current)return-1;// else we hold the exclusive lock; blocking here// would cause deadlock.}elseif(readerShouldBlock()){// Make sure we're not acquiring read lock reentrantlyif(firstReader==current){// assert firstReaderHoldCount > 0;}else{if(rh==null){rh=cachedHoldCounter;if(rh==null||rh.tid!=current.getId()){rh=readHolds.get();if(rh.count==0)readHolds.remove();}}if(rh.count==0)return-1;}}if(sharedCount(c)==MAX_COUNT)thrownewError("Maximum lock count exceeded");if(compareAndSetState(c,c+SHARED_UNIT)){if(sharedCount(c)==0){firstReader=current;firstReaderHoldCount=1;}elseif(firstReader==current){firstReaderHoldCount++;}else{if(rh==null)rh=cachedHoldCounter;if(rh==null||rh.tid!=current.getId())rh=readHolds.get();elseif(rh.count==0)readHolds.set(rh);rh.count++;cachedHoldCounter=rh;// cache for release}return1;}}}
fullTryAcquireShared首先会判断若其他线程持有写锁,则会阻塞。若readerShouldBlock返回true,则进入if分支,如果当前线程不是第一个读线程,同时当前线程是之前没有持有读锁,则会从ThreadLocal中移除HoldCounter,最后如果count仍是-1,则直接返回-1,阻塞当前线程。接着下来的代码就是对tryAcquireShared CAS state失败的处理,逻辑类似。
protectedfinalbooleantryReleaseShared(intunused){Threadcurrent=Thread.currentThread();if(firstReader==current){// assert firstReaderHoldCount > 0;if(firstReaderHoldCount==1)firstReader=null;elsefirstReaderHoldCount--;}else{HoldCounterrh=cachedHoldCounter;if(rh==null||rh.tid!=current.getId())rh=readHolds.get();intcount=rh.count;if(count<=1){readHolds.remove();if(count<=0)throwunmatchedUnlockException();}--rh.count;}for(;;){intc=getState();intnextc=c-SHARED_UNIT;if(compareAndSetState(c,nextc))// Releasing the read lock has no effect on readers,// but it may allow waiting writers to proceed if// both read and write locks are now free.returnnextc==0;}}
protectedfinalbooleantryAcquire(intacquires){/* * Walkthrough: * 1. If read count nonzero or write count nonzero * and owner is a different thread, fail. * 2. If count would saturate, fail. (This can only * happen if count is already nonzero.) * 3. Otherwise, this thread is eligible for lock if * it is either a reentrant acquire or * queue policy allows it. If so, update state * and set owner. */Threadcurrent=Thread.currentThread();intc=getState();intw=exclusiveCount(c);if(c!=0){// (Note: if c != 0 and w == 0 then shared count != 0)if(w==0||current!=getExclusiveOwnerThread())returnfalse;if(w+exclusiveCount(acquires)>MAX_COUNT)thrownewError("Maximum lock count exceeded");// Reentrant acquiresetState(c+acquires);returntrue;}if(writerShouldBlock()||!compareAndSetState(c,c+acquires))returnfalse;setExclusiveOwnerThread(current);returntrue;}
finalbooleanacquireQueued(finalNodenode,intarg){booleanfailed=true;try{booleaninterrupted=false;for(;;){finalNodep=node.predecessor();if(p==head&&tryAcquire(arg)){setHead(node);p.next=null;// help GCfailed=false;returninterrupted;}if(shouldParkAfterFailedAcquire(p,node)&&parkAndCheckInterrupt())interrupted=true;}}finally{if(failed)cancelAcquire(node);}}
publicfinalvoidawait()throwsInterruptedException{if(Thread.interrupted())thrownewInterruptedException();Nodenode=addConditionWaiter();intsavedState=fullyRelease(node);intinterruptMode=0;while(!isOnSyncQueue(node)){LockSupport.park(this);if((interruptMode=checkInterruptWhileWaiting(node))!=0)break;}if(acquireQueued(node,savedState)&&interruptMode!=THROW_IE)interruptMode=REINTERRUPT;if(node.nextWaiter!=null)// clean up if cancelledunlinkCancelledWaiters();if(interruptMode!=0)reportInterruptAfterWait(interruptMode);}
finalbooleantransferForSignal(Nodenode){/* * If cannot change waitStatus, the node has been cancelled. */if(!compareAndSetWaitStatus(node,Node.CONDITION,0))returnfalse;/* * Splice onto queue and try to set waitStatus of predecessor to * indicate that thread is (probably) waiting. If cancelled or * attempt to set waitStatus fails, wake up to resync (in which * case the waitStatus can be transiently and harmlessly wrong). */Nodep=enq(node);intws=p.waitStatus;if(ws>0||!compareAndSetWaitStatus(p,ws,Node.SIGNAL))LockSupport.unpark(node.thread);returntrue;}
publicclassSemaphoreimplementsjava.io.Serializable{privatestaticfinallongserialVersionUID=-3222578661600680210L;/** All mechanics via AbstractQueuedSynchronizer subclass */privatefinalSyncsync;/** * Synchronization implementation for semaphore. Uses AQS state * to represent permits. Subclassed into fair and nonfair * versions. */abstractstaticclassSyncextendsAbstractQueuedSynchronizer{privatestaticfinallongserialVersionUID=1192457210091910933L;Sync(intpermits){setState(permits);}finalintgetPermits(){returngetState();}finalintnonfairTryAcquireShared(intacquires){for(;;){intavailable=getState();intremaining=available-acquires;if(remaining<0||compareAndSetState(available,remaining))returnremaining;}}protectedfinalbooleantryReleaseShared(intreleases){for(;;){intcurrent=getState();intnext=current+releases;if(next<current)// overflowthrownewError("Maximum permit count exceeded");if(compareAndSetState(current,next))returntrue;}}finalvoidreducePermits(intreductions){for(;;){intcurrent=getState();intnext=current-reductions;if(next>current)// underflowthrownewError("Permit count underflow");if(compareAndSetState(current,next))return;}}finalintdrainPermits(){for(;;){intcurrent=getState();if(current==0||compareAndSetState(current,0))returncurrent;}}}/** * NonFair version */staticfinalclassNonfairSyncextendsSync{privatestaticfinallongserialVersionUID=-2694183684443567898L;NonfairSync(intpermits){super(permits);}protectedinttryAcquireShared(intacquires){returnnonfairTryAcquireShared(acquires);}}/** * Fair version */staticfinalclassFairSyncextendsSync{privatestaticfinallongserialVersionUID=2014338818796000944L;FairSync(intpermits){super(permits);}protectedinttryAcquireShared(intacquires){for(;;){if(hasQueuedPredecessors())return-1;intavailable=getState();intremaining=available-acquires;if(remaining<0||compareAndSetState(available,remaining))returnremaining;}}}
publicfinalbooleanhasQueuedPredecessors(){// The correctness of this depends on head being initialized// before tail and on head.next being accurate if the current// thread is first in queue.Nodet=tail;// Read fields in reverse initialization orderNodeh=head;Nodes;returnh!=t&&((s=h.next)==null||s.thread!=Thread.currentThread());}
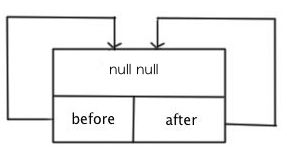
privatestaticclassEntry<K,V>extendsHashMap.Entry<K,V>{// These fields comprise the doubly linked list used for iteration.Entry<K,V>before,after;Entry(inthash,Kkey,Vvalue,HashMap.Entry<K,V>next){super(hash,key,value,next);}/** * Removes this entry from the linked list. */privatevoidremove(){before.after=after;after.before=before;}/** * Inserts this entry before the specified existing entry in the list. */privatevoidaddBefore(Entry<K,V>existingEntry){after=existingEntry;before=existingEntry.before;before.after=this;after.before=this;}/** * This method is invoked by the superclass whenever the value * of a pre-existing entry is read by Map.get or modified by Map.set. * If the enclosing Map is access-ordered, it moves the entry * to the end of the list; otherwise, it does nothing. */voidrecordAccess(HashMap<K,V>m){LinkedHashMap<K,V>lm=(LinkedHashMap<K,V>)m;if(lm.accessOrder){lm.modCount++;remove();addBefore(lm.header);}}voidrecordRemoval(HashMap<K,V>m){remove();}}
privateabstractclassLinkedHashIterator<T>implementsIterator<T>{Entry<K,V>nextEntry=header.after;Entry<K,V>lastReturned=null;/** * The modCount value that the iterator believes that the backing * List should have. If this expectation is violated, the iterator * has detected concurrent modification. */intexpectedModCount=modCount;publicbooleanhasNext(){returnnextEntry!=header;}publicvoidremove(){if(lastReturned==null)thrownewIllegalStateException();if(modCount!=expectedModCount)thrownewConcurrentModificationException();LinkedHashMap.this.remove(lastReturned.key);lastReturned=null;expectedModCount=modCount;}Entry<K,V>nextEntry(){if(modCount!=expectedModCount)thrownewConcurrentModificationException();if(nextEntry==header)thrownewNoSuchElementException();Entry<K,V>e=lastReturned=nextEntry;nextEntry=e.after;returne;}}
staticinthash(inth){// This function ensures that hashCodes that differ only by// constant multiples at each bit position have a bounded// number of collisions (approximately 8 at default load factor).h^=(h>>>20)^(h>>>12);returnh^(h>>>7)^(h>>>4);}
privateabstractclassHashIterator<E>implementsIterator<E>{Entry<K,V>next;// next entry to returnintexpectedModCount;// For fast-failintindex;// current slotEntry<K,V>current;// current entryHashIterator(){expectedModCount=modCount;if(size>0){// advance to first entryEntry[]t=table;while(index<t.length&&(next=t[index++])==null);}}publicfinalbooleanhasNext(){returnnext!=null;}finalEntry<K,V>nextEntry(){if(modCount!=expectedModCount)thrownewConcurrentModificationException();Entry<K,V>e=next;if(e==null)thrownewNoSuchElementException();if((next=e.next)==null){Entry[]t=table;while(index<t.length&&(next=t[index++])==null);}current=e;returne;}publicvoidremove(){if(current==null)thrownewIllegalStateException();if(modCount!=expectedModCount)thrownewConcurrentModificationException();Objectk=current.key;current=null;HashMap.this.removeEntryForKey(k);expectedModCount=modCount;}}
publicclassCountDownLatch{/** * Synchronization control For CountDownLatch. * Uses AQS state to represent count. */privatestaticfinalclassSyncextendsAbstractQueuedSynchronizer{privatestaticfinallongserialVersionUID=4982264981922014374L;Sync(intcount){setState(count);}intgetCount(){returngetState();}protectedinttryAcquireShared(intacquires){return(getState()==0)?1:-1;}protectedbooleantryReleaseShared(intreleases){// Decrement count; signal when transition to zerofor(;;){intc=getState();if(c==0)returnfalse;intnextc=c-1;if(compareAndSetState(c,nextc))returnnextc==0;}}}
privatevoiddoAcquireSharedInterruptibly(intarg)throwsInterruptedException{finalNodenode=addWaiter(Node.SHARED);booleanfailed=true;try{for(;;){finalNodep=node.predecessor();if(p==head){intr=tryAcquireShared(arg);if(r>=0){setHeadAndPropagate(node,r);p.next=null;// help GCfailed=false;return;}}if(shouldParkAfterFailedAcquire(p,node)&&parkAndCheckInterrupt())thrownewInterruptedException();}}finally{if(failed)cancelAcquire(node);}}
首先看addWaiter方法
1234567891011121314
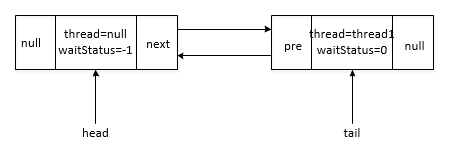
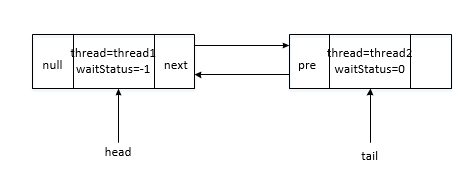
privateNodeaddWaiter(Nodemode){Nodenode=newNode(Thread.currentThread(),mode);// Try the fast path of enq; backup to full enq on failureNodepred=tail;if(pred!=null){node.prev=pred;if(compareAndSetTail(pred,node)){pred.next=node;returnnode;}}enq(node);returnnode;}
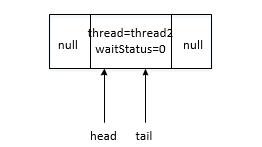
也就是说在pred为null的时候会初始化队列
123456789101112131415
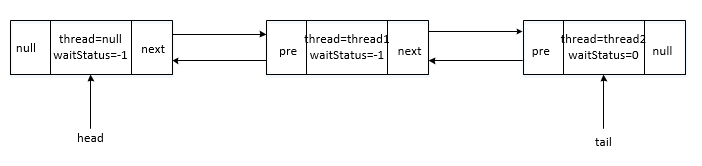
privateNodeenq(finalNodenode){for(;;){Nodet=tail;if(t==null){// Must initializeif(compareAndSetHead(newNode()))tail=head;}else{node.prev=t;if(compareAndSetTail(t,node)){t.next=node;returnt;}}}}
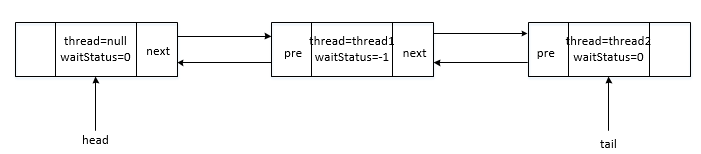
privatestaticbooleanshouldParkAfterFailedAcquire(Nodepred,Nodenode){intws=pred.waitStatus;if(ws==Node.SIGNAL)/* * This node has already set status asking a release * to signal it, so it can safely park. */returntrue;if(ws>0){/* * Predecessor was cancelled. Skip over predecessors and * indicate retry. */do{node.prev=pred=pred.prev;}while(pred.waitStatus>0);pred.next=node;}else{/* * waitStatus must be 0 or PROPAGATE. Indicate that we * need a signal, but don't park yet. Caller will need to * retry to make sure it cannot acquire before parking. */compareAndSetWaitStatus(pred,ws,Node.SIGNAL);}returnfalse;}
protectedbooleantryReleaseShared(intreleases){// Decrement count; signal when transition to zerofor(;;){intc=getState();if(c==0)returnfalse;intnextc=c-1;if(compareAndSetState(c,nextc))returnnextc==0;}}
privatevoiddoReleaseShared(){/* * Ensure that a release propagates, even if there are other * in-progress acquires/releases. This proceeds in the usual * way of trying to unparkSuccessor of head if it needs * signal. But if it does not, status is set to PROPAGATE to * ensure that upon release, propagation continues. * Additionally, we must loop in case a new node is added * while we are doing this. Also, unlike other uses of * unparkSuccessor, we need to know if CAS to reset status * fails, if so rechecking. */for(;;){Nodeh=head;if(h!=null&&h!=tail){intws=h.waitStatus;if(ws==Node.SIGNAL){if(!compareAndSetWaitStatus(h,Node.SIGNAL,0))continue;// loop to recheck casesunparkSuccessor(h);}elseif(ws==0&&!compareAndSetWaitStatus(h,0,Node.PROPAGATE))continue;// loop on failed CAS}if(h==head)// loop if head changedbreak;}}
privatevoidunparkSuccessor(Nodenode){/* * If status is negative (i.e., possibly needing signal) try * to clear in anticipation of signalling. It is OK if this * fails or if status is changed by waiting thread. */intws=node.waitStatus;if(ws<0)compareAndSetWaitStatus(node,ws,0);/* * Thread to unpark is held in successor, which is normally * just the next node. But if cancelled or apparently null, * traverse backwards from tail to find the actual * non-cancelled successor. */Nodes=node.next;if(s==null||s.waitStatus>0){s=null;for(Nodet=tail;t!=null&&t!=node;t=t.prev)if(t.waitStatus<=0)s=t;}if(s!=null)LockSupport.unpark(s.thread);}
privatevoidsetHeadAndPropagate(Nodenode,longpropagate){Nodeh=head;// Record old head for check belowsetHead(node);/* * Try to signal next queued node if: * Propagation was indicated by caller, * or was recorded (as h.waitStatus) by a previous operation * (note: this uses sign-check of waitStatus because * PROPAGATE status may transition to SIGNAL.) * and * The next node is waiting in shared mode, * or we don't know, because it appears null * * The conservatism in both of these checks may cause * unnecessary wake-ups, but only when there are multiple * racing acquires/releases, so most need signals now or soon * anyway. */if(propagate>0||h==null||h.waitStatus<0){Nodes=node.next;if(s==null||s.isShared())doReleaseShared();}}